Showing posts with label Martha MacGyver. Show all posts

Monday, February 24, 2014

Upcycled

Howdy!  February has almost slipped away with only one single lonely post.  How does that happen?!?

I want to share an idea with you that I made and sent to a friend.  It's right up her alley because she loves burlap, and textured fabric.  And I love turning something that used to be considered trash into something useful.
 
Remember those old coffee cans that nobody keeps anymore and only pack-rats have burried in their garage?  Or you can find them full of buttons at garage sales.  Here's a great idea to re-purpose that old coffee can.

Here are my ingredients:


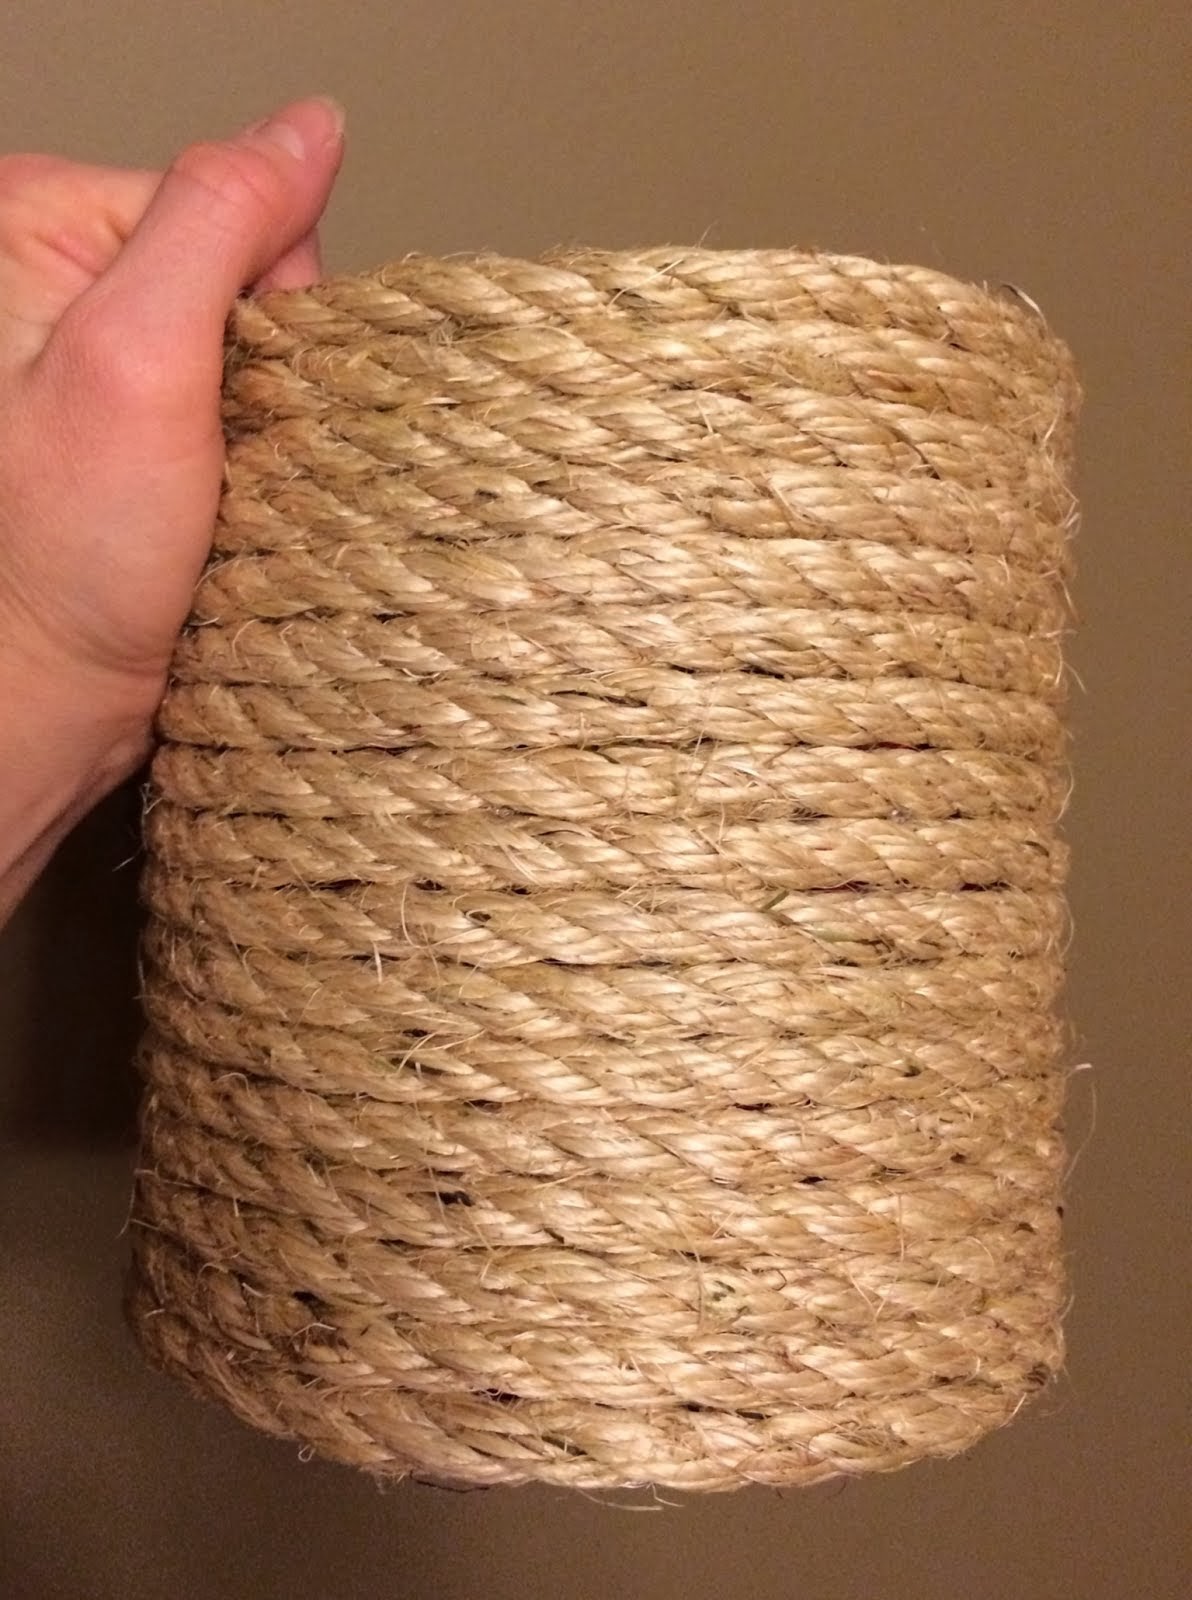
I bet you can imagine what I did with these 3 items....  And this is the interior view after I glued the rope all around it:


Ta-da!  Isn't it cool?!?  It could be a plant pot cover, a pen holder, a mail receptacle, etc.  The uses are limitless!

So there you have it, my 2nd post in February.  Tomorrow will be much more exciting.

SOMEONE around here is turning 11.  And he's someone to really celebrate!  I need to go frost his cake...

Saturday, January 11, 2014

Crafty New Year!

HappyCrafty New Year to you!  I've had a lot of projects going on lately (or rumbling around in my head that I intend to do).  Just can't wait to share them with you.

Here's one I tried to get done for Christmas, but just didn't manage to.  I saw this on Pinterest and had to try it.  So off to the store I went for bobby pins and gold spray paint.


Who wouldn't love their name in pasta?!?

Mine did not turn out as neat as the Pinterest post, because the glue I used wasn't real smooth, and the pasta I used wasn't uniformly sized.  But hey, I already had the alphabet pasta in a soup mix, I just had to pick it out of the lentils.  I tried to find alphabet pasta and our normal grocery stores did not carry it, so I used what I had!

Up next, we are making homemade mozzarella cheeeeeeese this weekend!  For home cooked pizza.  Can't wait for dinner!  I will post soon of our cheesy experience. 

Until then, let me leave you with a beautiful picture of my beautiful friend and her beautiful horses.  I'm so happy I got to see them for a brief visit last month!


Beautiful horses!


Beautiful redheads


Bon Appetit! 


Saturday, December 28, 2013

Nailed It, Christmas Edition

Hope you had a lovely Christmas!  Mine was wonderful.  It was a nice and relaxing morning as we opened gifts, then had an amazing brunch.

Todd's Frittata
I wish you could smell the cheesiness in the picture above.  It was so yummy.  

Then we had an excellent prime rib dinner.  We had a special stash of my mom's buns!  My mashed potatoes were not as good as my Thanksgiving mashed taters, but they were acceptable.  I think I needed a combination of yellow and russet, and should have used the entire brick of cream cheese.  Live and learn. 

A Merry Christmas Dinner!

Enough about food.  I've been feeling extra crafty lately.  Christmas does that to me.  I love giving homemade gifts because you know they didn't get another one just like it yesterday from a relative, and the gift receiver knows you thought about them while making said project.  I didn't get to everything I wanted to make, but what I did make this year included:
  • Homemade sugar scrubs, one old recipe and one new
  • Homemade Ginger Hot Cocoa mix (since the guys at the office wouldn't appreciate a sugar scrub)
  • A little painting for a few folks I haven't painted for in years past (old design, nothing new)
  • And a risky new idea... (I finished at midnight last night)

But first, another story.

I've been on a search for a wreath that doesn't suck.  Why don't I search for a wreath that I actually like, or even that I love?  Thanks for asking.  Because I am extremely picky, and this search has been going on for years.  A wreath that I would love doesn't exist.  I hate fake flowers.  Cause, well, they LOOK fake.  I grow the real thing.  Why bother with an imitation.

I found a wreath at a garage sale for $2 last summer that is acceptable and which now hangs on my front door.  The flowers are obviously fake and they aren't made to try to look real.  It's a grapevine wreath (about the only kind I like) with big cabbage type roses that are red on one side and have a white/brown stripe on the other side that kind of looks like a wood grain.  It will do.

And then one day while flipping through catalogs shopping for Christmas, I found this one:

 
MAIN IMAGE
Napa Valley Style with a Napa Valley Price Tag
For those of you who didn't catch the price on this little beauty, it's $129.  Plus shipping.  Did I mention that I'm also cheap thrifty?  Also, there are little things about it that I'm not in love with--there is greenery that looks fake to me, although I love the eucalyptus.  The pomegranates are cute and don't look fake, but the apples look TOO perfect.  SEE HOW I AM?!?!?!!  I pick every wreath apart and focus on the things I don't like although I am proud of mentioning two things that I actually do like.

See the dehydrated orange slice at about 8 o'clock in the picture of that Napa Style wreath?  THAT was my inspiration.


So what do I get for a foodie-couple who describes their style as "minimalists" for Christmas?  Well sometimes it's tough.  But then I think of food (savory over sweet for them), because that is their greatest passion, to get an inspiration.  They also garden, so there are options down that avenue too.  Actually when I think about it, they really aren't hard to shop for at all!

The answer to my question is, a culinary masterpiece.  That orange slice triggered something inside my creative brain cortex--to make a food oriented wreath!  So off to Michael's I went.  I went up and down every stinking aisle trying to find the perfect food oriented options to attach to the perfect grapevine wreaths I chose.  I could go with little fake oranges and fake lemons & fake limes, and fake apples.  Or I could go with fake little peppers and fake artichokes, and fake carrots.  And then?  It will look... fake.  Forget it, I give up on these options because it's going to look HORRIBLE.  And fake.

But I didn't give up on the idea.  Instead I made a grocery store list which consisted of:
  • Bay leaves (hubby acquired 100 leaves off eBay, thanks dear!)
  • Blood oranges
  • Lemon
  • Red apple
  • Garlic heads
  • Sage (from my own garden)
  • Chili peppers (from our kitchen cabinets, some are dried from our own garden) 
My hubby acquired the goods, and enlisted the help of a friend because our small-podunk town doesn't carry blood oranges.  Once I acquired my goodies, I started slicing very carefully on my mandolin slicer (that goes BOTH ways--very cool kitchen tool that chops slicing time in HALF). 

Then I placed my sliced pieces on wax paper lined cookie trays and baked at 125-150 degrees for a day.  I baked the garlic heads for about 3 days.  My sage dried nicely on it's own, since I picked it a few months ago, just had to keep it away from prying dog noses.  I've been planning this for months.

But I was nervous about the end result.  Because remember?  I'm really picky.  But I started assembling the wreath last night, and I couldn't stop until I was finished.  Here it is:  

My Homemade Culinary Masterpiece!
I think I NAILED IT!  EVERYTHING except the glue and the grapevine is edible.  Or was, before I dehydrated it.  Oh, there I go again, talking about food.  Also, it smells good.  The sage really gives it a nice fragrance.  

I think they are really going to like it.  It's pretty fragile though--I hope it makes it home with them without too many broken pieces.


This took an amazing amount of slices from an apple, a lemon and three blood oranges.  I thought I would have enough to make one for my own front door too, but I have to dry more fruit out before I can assemble my own.

Also, I'm a tiny bit worried that birds will try to eat the dried fruit from my front door.  Oh, the problems of living in the country....


So, what do you think of my culinary masterpiece?  Hope you had a great Christmas whether it was crafty or not!

Saturday, February 2, 2013

Fan Mail

I've had a couple of questions from one of my fans.  I'd like to take a moment to provide answers.

Question 1:

She asked:  "What in the hell is an office space doing in caves?! Are they real caves, or excavations, or what? I need a whole post on this because...mind...blown."

That is a really fun question!  There are some mountains in the KC metro area that have been excavated to create caves that are used for office space, and storage.  Read more about it here.  They are most commonly known for storing archived media.  It's like another world in there.  Albeit a slightly dirty one.  It's where almost every company I ever worked for in the area always sent documents for archival "to the caves".

During the Groundhog Race, there are so many bodies conducting heat, that it feels like a sauna.  There is one turn on the course where you can breathe some cool, fresh air coming through the doors the trains enter into/exit out of the cave.  Other than that, you feel like a roasting chicken on a spit.

I ran this race in 2005, and it was stinky.  I literally ran the 5K as fast as I could to get out of the stench.  I believe it had been a very wet winter.  I didn't think I'd ever run it again, but I wanted to do a 10K around that time of year.  So I ran the 10K in 2006, and it was not stinky.  Relatively speaking, I mean, you're inside a mountain.  It's not going to smell like a beach.

Question 2:

She asked for my Lemon Sugar Body Scrub recipe.  You aren't going to believe how stupid simple this stuff is to make.  Seriously.  When you realize how easy it is, it will make the recipients of this gift think I fooled them or something.

I looked around at online recipes for homemade scrubs.  Then I saw a recipe in a magazine that I liked.  I reviewed my options then did my own thing.  I kept it really simple.  I think it turned out the best.  I experimented with more ingredients, but I like the short and sweet (pun intended) version. 

Lemon Sugar Body Scrub:
1.5 cups sugar (nothing special)
1/3 cup olive oil (use the cheap stuff)
2-4 drops essential oil (I used lemon)

Mix it up and enjoy.  It really can't get any easier than that.

Other ideas for variations:
  • The printed recipe I consulted also had a version that I thought sounded interesting.  Add 2 tablespoons of cocoa and use peppermint, cinnamon, or orange essential oil.  The printed recipe also called for adding food coloring, but who needs to tint their skin?
  • I'd like to try using salt (but the sugar is such a nice exfoliant). 
  • I want to try:  sugar, olive oil, and vanilla or almond extract to use as a Sugar Lip Scrub.  It would be safe to eat!
  • You could add lemon juice (just be sure to realize this makes you more sensitive to the sun).

So there you have it, enjoy!

Thursday, January 31, 2013

Craftiva

I wanted to make homemade gifts this past holiday season.  I've just been waiting to share with you my Christmas craft ideas.  We finally had our last celebration, so without further ado, here they are! 
 
My first idea was to make a t-shirt vest.  I cut up a t-shirt according to the directions, and it looked like, well... I cut up a t-shirt.  It was pretty bad.  CRAFT FAIL

Fortunately, the next idea went better.  I made t-shirt scarves.  They didn't turn out quite as well as I had hoped, but I did like them.  I thought about making little pins covered with beads to place on the part where it's gathered.  I might still do that.  The project was fun to make.  I saw a pic of Tullybird wearing hers, and it looked really good!

My version of t-shirt scarves

Next up, I made a Lemon Sugar Body Scrub.  I soon realized after I whipped this stuff up, that I really like this stuff.  My hands have been dry and itchy all winter.  Rubbing some of this on when I've been doing a lot of hand-washing really helps.


Warning:  you may fall on your ass if you use this on your feet while standing!
But man, do my paws need this stuff.

For my next project, I was only able to make a few of these this year.  I need to start earlier next year.  I love painting wine bottles.  My specialty is a snowman... because they are easy.  And this year, I made a female version who loves the tropics! 

My inspiration was when Tullybird mentioned that she keeps the first bottle on display all year around that I painted for her; it doesn't matter what season it is.  Snowman needed a girlfriend!


Aloha!

And for my very favorite project of all.  This was SO fun, but so time consuming.  I could only make one at a time.  I started out by growing sunflowers.  Giant, mammoth sunflowers.
Keystone in my giant sunflower forest
Then I added lots of love and cement. 

I used our existing plain, smooth birdbath as a mold.  I put a trash bag over it to protect it.  Then I poured on mixed up grout mix.  I smoothed it out and then pressed my huge sunflower leaf into the wet grout mix.  Let it sit for 24-48 hours, and viola!

 
This birdbath has magical powers
This is one of the special editions that I made.  I had the most fun telling Suzie's little girl that baby unicorns drank from this birdbath; that's why there is glitter.  Cause everyone knows that baby unicorn's have glitter on their tongues.  I think she really enjoyed the story.  I truly believed in unicorns when I was her age.  Remember the days of rainbows & unicorns and when stickers were special treats?

For Dawn's family, I put a nice rock towards the bottom of the bath.  This is to allow butterflies to rest on the rock while sipping their cool beverage.  Plus they have a bath-less butterfly garden.  Until now.

I can't tell you how badly I wanted to make Shelly one of these.  She likes birds has a bird obsession.  Next to my parents and my hubby, I don't know anyone else who feeds their wild birds as much as she does; and enjoys watching them too.  It about killed me not to be able to make her one and send, but the cost would have been astronomical to send a hunk of huge, heavy concrete across the country.

And I really wanted to make Tullybird one too.  She loves everything homemade that I make, and she would have loved to have had one in her yard under her apple trees.  But again, the shipment cross-country just wasn't going to work.  Not to mention that they would probably beak.

So, it was hand delivery only for the birdbaths.

I hope you enjoyed seeing my projects.  I had other ideas that I didn't get to.  Maybe I'll start much earlier this year.
 

Sunday, October 28, 2012

Easy 3-Ingredient Pumpkin Chip Cakies

This time of year gets me in the mood to bake something pumpkin-ish.  The typical pumpkin-dump-cake would be great, but I really didn't want to use 2 to 4 eggs along with 1 or 2 sticks of butter plus a ~cup of sugar.  Would I love it?  Yes.  Would I eat the entire thing?  OF COURSE. 

All the recipes on the Internet were looking like variations of the same thing.  Then I saw a recipe for a cake that had 2 ingredients.  Just the inspiration I was searching to find!  Then I decided to do my own thing.  Maybe it would work, maybe it wouldn't...


These are even somewhat healthy!  Or rather, they are healthier than the
pumpkin-dump-cake recipes littered all over the 'net.

Easy 3-Ingredient Pumpkin Chip Cakies*

*What's a "cakie"?  It's a cake-like cookie, or a cookie-like cake.  Did I just make that up?  Mmmm, maybe.
1 box cake mix (white, yellow, spice)
1 can (15 oz) pumpkin
Optional: chocolate chips

Mix it all together.  Drop by the spoonful onto a greased cookie sheet.  Cook at 350 for 12-16 minutes.  If they are smaller, it might take less time.  If they are bigger, it might take more time.  You know the drill, test with a toothpick.

Variations could be endless!  White, milk, or dark chocolate chips.  Pecans, almonds, or walnuts.  Go crazy and add craisins or candied ginger.  Get totally wild and crazy and add Heath pieces!

I whipped these up and ate a few before they ever cooled off because I couldn't help myself.  I think I burned my mouth, but totally worth it.  I was very pleased with the result.  I used a white cake mix because I had it in the cupboard.  I wanted a spice cake mix but didn't have one.  So I resolved that problem buy stirring in the following spices to the white cake mix to spice it up:  cinnamon, ground clove, ground ginger, and nutmeg.  Viola!  Problem solved.

If you need an easy recipe to bake, here it is!


Tuesday, August 28, 2012

Another Tree For Me

Hello, and welcome to my 200th post!  I don't expect that to mean a thing to anyone else, but for me, it's a major milestone.  I wanted to post something meaningful, but I've spent more time these past few days trying to select the topic, and I've gotten writers block.  So screw it.  I'll update you on my latest project, which is what I really want to tell you about anyway.


When I was growing up, I loved stickers.  Like most little girls, I was mesmerized by their beauty.  I coveted and hoarded them.  I carefully planned where I would stick each one, because it had to be perfect.  You only get one chance to stick it.  If you don't stick it just right, there are no do-overs.

I remember saving most of my stickers just like I bought them, keeping them on their original paper.  I had big plans for those stickers--I couldn't just go around sticking them all willy-nilly on anything and everything.  That would be irresponsible sticky-ness.  They had to be protected, loved, and daresay, respected.  My school notebook was decorated with my favorite stickers.  I still remember the scratch 'n' sniff doughnut stickers I thought were adorable.  I think I had an ice cream cone one too and chocolate bonbons.

Over the past couple of days, I've been able to play with lots of great stickers again.  They aren't scratch 'n' sniff, but they ARE totally cool. 

Todd hung a mirror above the bed, and I used some decals around it.  I'm not happy with the positioning of the top left one, so I will rearrange it.  Part of the scroll is behind the mirror.  Dang static cling.  I have a few more of these scrolls scattered throughout the bedroom.


Added some pizazz around the bedroom mirror

I've been planning another sticker project for over 6 months.  I was thinking it would be a major P.I.T.A, and I would probably end up getting so frustrated that I may scrap the whole thing.  But alas, I got to this project today.  And I am delightfully surprised.

First step = Cut all the pieces apart and get a game plan on what connects where.  This was like a jigsaw puzzle, although an easy one.  The directions were obviously not written by a native English speaker, but it made enough sense that I understood the intention. 


Placing all the pieces together--what did I get myself into?
Next step = Put up the first piece.  This was by far the scariest and most important step.  I wasn't sure how the plastic was going to be to work with when pulling off the wall (and the decal was supposed to stay in place).  And if I get this puppy crooked, all other pieces will be off.  Fortunately the trim wasn't flush against the wall, so I was able to maneuver the sticker right up to the baseboard.


Piece #1 = scary sticking
 

Continue putting up the pieces.  The only problem I encountered is that the film you use to stick the sticker onto the wall with, wasn't always bigger than the decal on the edge.  I had to carefully peel the sticker up and stay positioned, since this particular rectangle was a guide for centering the next piece to the last piece (slightly important to keep in place).

Could have been manufactured better, but I figured out how to work with it.

Continue placing pieces until they are all in place.

And then all of a sudden, a real wall-size tree comes to life within an hour!  This sucker went up QUICK!  I was so happy with how it worked, that I would have no apprehension doing any kind of decal sticker again.  I think the bigger ones were actually easier to work with than the smaller decals.  If it has a transfer film over it, it's pretty easy to work with vs. the clear plastic stickers that produce more static cling than a cattle dog running on shag carpet in a high dry climate.

I'm ready to print some pictures, buy some frames, and hang them from my "family tree".  Which will happen to be a literal tree of pictures in my hallway.  I will post a picture of it completed, but it will be a few weeks out for that.  Making decisions on which pictures to use will take me awhile.

So happy with our hallway tree!
Soon there will be pictures "hanging" from the branches.
 

Sunday, February 26, 2012

Happy 9th Birthday!

Our kids turned NINE YEARS OLD yesterday!  In celebration, I broke out the ol' Three Dog Bakery cook book and whipped up a masterpiece.  I love baking for my kids.  They somehow instinctively KNOW I am baking Just. For. Them.  It's rather odd how they know.  Maybe it's the way I look at them while I'm twirling about the kitchen, grabbing the bananas, or the wheat flour, or the yummy peanut butter.  Oh, they know what's in a peanut butter jar, trust me.  Nothing but love.

This year, I substituted molasses for honey, and I had no eggs.  So I substituted an extra banana and a little more baking powder for the missing egg.  Worked like a charm--thanks for the tip, Internet.  They never noticed a difference.

See my masterpiece here:

I know this looks like a backwards G, but I wanted to maximize the use of cake.  The children agreed with my approach.  Also, I wasn't going to frost the sides because that gets really messy.  So I stuck dried banana chips to the edge with frosting.  They agreed with this use of banana chips too.

Notice their tongues as they impatiently await their birthday cake.
This is not their first rodeo:


After the cake feast, these pics remind me of coming off a sugar high (except the only sugar was molasses). 

Here is Shadow (and this was her first rodeo birthday party):


Here is Abbytail:

And here is Keystone:  

Go here to watch the feast:


A special Happy Birthday to my God-dog-son Baxter, who I miss.  We send lots of hugs, kisses and love to this special guy on his special day too.

Happy Birthday to my furry 9 year olds!

Saturday, December 31, 2011

Martha MacGyver's Last Week Of 2011

Goodbye 2011 and Cheers to 2012!

I was fortunate to be able to take off the last week of 2011 and spend time at home doing things that have been on my to-do list since we moved here. Several pictures have finally made it to their final destination on the walls. Several junk areas have been cleaned up. Several boxes have finally been unpacked.  I am pleased with the changes.  It's beginning to not only feel like home, but look like home too.

Years and years ago, my buddy gave me the nickname of Martha MacGyver because of all my crafty creative projects.  It hadn't occurred to me at the time, but yea, the name fit.  To share some of my wonderful projects from my Christmas/New Year break, I share with you the following:

1) Based upon the inspiration from the lovely daughter (and her hat) of Mrs. Irritation, I improvised this owl hat.  I totally made up the pattern, and I HOPE to be able to replicate this.  So thankful for YouTube, because I had forgotten how to knit!


2) I saved an old picture frame from the donation pile and spray painted it glossy red. Thanks for the inspiration from Statia.  I hated the old frame (two colors of cheap looking wood); and am loving my new frame.  Now to find a picture to put in it...


3) I had no place to store/display the jewelry I've made. Since I moved, I have not worn much of my jewelry because I have not unpacked it.  <gasp>  I know, I know. I went thrifting in my own house and discovered a few picture frames my husband has had for probably the last decade or two. This one became my new jewelry holder! Inspiration came from Pinterest and/or Etsy, take your pick. It turned out perfectly for my needs.  Keep in mind, I am on the lookout for old drawer pull knobs to re-purpose along the bottom on the front and on the sides to hold bracelets and necklaces.  I'm not buying new knobs, that would just be silly!


Why yes, that is hardware cloth, thanks for asking.


4) This is my favorite one. Over thanksgiving, my parents visited.

     Me: "I need to buy a grapevine wreath, but I'd much rather make one."

     Dad: "You know, you have some wild grapevines growing in your woods."

     Me:  <Blink Blink>

     Dad: "Let's go pull some."

     Me: "Uuuhhhh, are they the kind with the curly-Qs?" (that's a technical term)

     Dad: "Yea."

So, we march right down there and I'll be hog-tied if there weren't wild grapevines growing right here. For FREE. So my dad went to work pulling a few long vines down from an overgrown area for me.  I had no clue they were wild grapevines (I didn't see any grapes!).  I dragged them up to our back deck. I got out the butchers twine (sorry to the hubs on that, but at least I used the OLD spool) and a pair of scissors. My mom helped me form the long vines into a large circle. She would hold the vines together and I would tie the string around it -or- I'd hold and she would tie. We got the large circle formed. She reminded me about how the professional ones are steamed into shape. I got bowls of hot water and poured over the wreath since it was still outside. Oh yea, it was rainy, so I left it in the rain for a day. Brought it inside to dry out for a month. Then I cut the ties and spray painted it glossy black. Found the perfect garland with sprays of clear crystals. I am very pleased with this grapevine wreath project as it surpassed my vision. See next item for picture.

5) Painted my hole! I expected a little more of a brown/warm color and not such an *exact* match to the grout (which if I had intended to match the grout, I would have chosen a different shade). But it has grown on me and now that I have it all put together, I love it!   This was the before picture.  Below is my finished project. It doesn't look ecclesiastical anymore!  I am no longer looking around my own living room for a sacrificial virgin or bride & groom!


I will be on the search for new curtains in black & white and possibly grey, with a splash of red.  Some kind of modern print.  And the brass fireplace set has to go, or be changed.  Shadow and Abbytail seem to like it:


6) This one was all Todd's. He hung the Arcade sign in the perfect spot!  You can't see the hardware, except for the angle at which I took this picture, of course.  This is a PERFECT fit and looks great when going down to the basement.  I'm so excited to have this puppy up in it's final spot on the wall.


I have a few more projects in the works, and a lot more swimming around in my head.  You'll have to stay tuned for more as I get them completed.  I don't make new years' resolutions, so I'm not going to wax poetically about all the great things I will accomplish or change next year.  I am thankful and excited just to have the day off from work.  I'll spend it making things a little more organized or crafty around here.

Happy 2012 to you!